
I’ve often wondered what my life would be like as a vegetarian. Would I be the best vegetarian out there? In case you were wondering, I’d be the worst vegetarian. On the planet. Would I have more energy and be healthier? Maybe. I could always use more energy to continue on my quest to take over the world. (I’m only partially kidding about that). I’d definitely be doing my part for the animals. I wouldn’t be terrified anymore that one of them was going to kill me in my sleep. (Not really a fear of mine). Because I’ve eaten meat my entire life, I’m assuming it would be very difficult for me to just become a vegetarian all of a sudden, out of the blue. I’ve grown up on it and I can’t picture myself giving up red meat, chicken and pork forever. Permanently, never again? No way. Don’t even get me started on seafood. I don’t think I could survive life without fish tacos. I’m from California, they’re a staple in my diet. Don’t get me wrong, it’s not like I eat red meat every single day of my life. What am I, a T-Rex? I wish. I think it would be a problem if I did chomp my teeth into a steak everyday, but every once in a while I do crave red meat. I gotta have it. To be more specific, I crave a really good beef burger with a homemade bun and thin and crispy fries every now and then. I’m probably the only person who suffers from such cravings, right? Have to be. Obviously I wouldn’t be able to eat good ol’ beef burgers if I were a vegetarian, and that makes me really sad. That’s my number one hesitation with becoming a vegetarian. A life without burgers or a nice piece of steak is a sad life for me. In all honesty, most often, I end up eating chicken on a day to day basis. To the point where a good friend of mine refuses to come over for dinner anymore because she claims I’m always forcing chicken down her throat whenever she visits me. “If I eat anymore chicken, I’m going to fly the F out of here.” Total lie by the way. It’s like 95% chicken and 5% other stuff when she comes over, not all the time as she likes to claim. She’s an exaggerator. Now though, I do it on purpose and tell her we’re having something else and then I get her into my house and serve her chicken with a maniacal laugh. She totally likes it.
I know I’d never survive as a vegetarian. I’ll be honest and straight forward with that confession, right off the bat. I love all food way too much for that kind of commitment, but every now and then—a few nights a month because that’s all my body will allow—I like to make a vegetarian meal. It’s nice to get more vegetables into my system, because let’s face it sometimes I really forget to eat veggies (sorry mamma), and it’s the perfect excuse to get out of my comfort zone in the kitchen as well. It forces me to think outside of the box. It also allows me to diversify this tiny blog of mine with dishes that you guys would actually like to try out. It wouldn’t be fair to you if all I gave you were the same meat, chicken and pork filled recipes that were heavy and super rich. Really, I’m just sneakily expanding my net and trying to coerce more people (The Vegetarians) to follow my blog. World domination remember?
So this one is for all the vegetarians out there. Even the semi-vegetarians that say they’re vegetarians but have a soft spot for bacon every now and then when no one is looking. Yeah, you know who you are. I think vegetarian food gets a bad reputation. Mostly because people spread nasty rumors about it being bland and boring. And by people I mean me. I was spreading those rumors, but in my defense, that was before I grasped a good understanding for vegetarian meals. One day while I was eating potato chips disguised in a rice cake bag, I had an epiphany. “Jon, you’re about to have an epiphany,” I told myself. “Vegetarian food doesn’t have to be boring and bland. It can be flavorful and tasty and hearty. Why, you don’t need meat in your life at all!” Then I slapped myself in the face and threw my drink in the air because that was crazy talk talkin’. Of course I need meat. But the first part of that epiphany was totally true. So I decided to come up with some filling veggie-centric recipes that would satisfy the vegetarians in my life, and at the same time fit the bill for those carnivorous animals like myself. So I bring to you, drumroll please, ba da ra rummmmm, VEGETABLE POT PIE!! Wait, I’m not giving it any justice. I present to you, ROASTED AUTUMN VEGETABLE POT PIE. You can thank me now. And by thanking I mean, you can now name your next child after me, if you have one. If you don’t, then you can change the name of the one you already have. You laugh now but when you actually taste this dish, don’t be surprised when you start calling your child Jonathan. Just a fair warning.

Do you recall the fact that I’m always talking about crusts? Crusts being the best part of any dish or treat that involves crust of course. “Crust is the best part!” That’s what I’m always saying. And I say this because it’s 100% accurate. Crust IS the best food on the planet. Hands down. No contest. Sure the fillings and toppings are great, and you definitely need them to complete the recipe and overall taste, but there’s just something amazing about warm flaky, buttery crust. There’s nothing else like it. I can never say no to it. I’m very fortunate to have grown up with a sister who despises crust (weirdo) because I always, and still do, get to eat her crusts. It’s kind of the best deal on the planet.
Well enough about that. Pot pie obviously has crust and I’m super excited about that. Let’s make some crust, shall we? This isn’t an ordinary pot pie crust. Plain and boring, nope. Not for us. We’re better than that. We’re going to be making a black pepper and rosemary crust for our pot pies. All other pot pies will be totally jealous. OOOOOOH AAAAAAAAHH. Cue the music from heaven and the clouds parting and the sun shining down onto this crust.

So the dough for the crust is fairly simple. Like really simple I’m embarrassed to even show it. I’m going to do it by hand to show you all just how easy it is to make. Now you know me well enough to know that Jonathan Melendez hardly ever makes anything by hand. This is that easy. Take note.
Dump some flour into a bowl.
To the flour add, salt, baking powder, and lots of black pepper (well it’s a black pepper crust duh!)


We’re also going to need fresh rosemary. I envy people who have herb gardens in their backyards or balconies or even their windowsills, so much. They’re the luckiest people in the world. If you have an herb garden and tell yourself while cooking, “I’m just going to go to my herb garden and grab some fresh herbs….” I automatically hate you. We’re mortal enemies. I kid I kid. But not really.
It’s not that I can’t grow an herb garden myself, but the real truth of the matter is that I can’t grow anything to save myself. Don’t give me any plants, I’ll kill them. I don’t have a green thumb whatsoever, which is why I hate you if you do.

Strip off the leaves from the stems and give it a rough chop. You want it to be minced but if a few larger pieces make it into the dough, that’s okay. I actually like that because it enhances the look of the dough and the flavor of course.
Sprinkle it into the flour. You need to sprinkle it in, okay? You cannot dump it. Throw it. Nor toss it. Must be sprinkled. It makes all the difference, trust me. Okay I’m joking. It doesn’t make a difference whatsoever. Did I fool you? I hope I did. If I didn’t fool you, well, just lie to me and pretend I did. But whatever you do, just don’t tell me you have an herb garden. MORTAL. ENEMIES.


Give it all a good whisk or toss with a fork to evenly combine all the ingredients together. Stand back because it can get messy. Flour likes to fly.


Let’s add some butter yeah? Because we all know that butter is what makes the crust delicious. We need cold butter. Very cold butter.
**Tip: If you recall from the last post, the butter needs to be super cold when making crusts because cold butter creates steam pockets in the oven, while it bakes. Steam pockets create flaky crusts. Flaky crusts makes Jonathan happy. It’s all science friends. Science and magic of course.**

Rub the butter into the flour with your fingers. If you have one of those fancy handy dandy pastry cutters, you can use that as well.
You can also use a fork or the old fashioned two knife scissor method. Either way, break down the butter until it resembles coarse crumbs the size of peas.


It’s okay if there are larger pieces of butter here and there. I got lazy and stopped rubbing the butter. The large butter chunks don’t hurt the dough any. I actually think it helps somewhat. Flakier crust remember?
**Note: Most crust or pastry doughs such as this usually require ice water. The galette crust from the last post is made with ice water, if you recall. This dough is a bit different. We’re going to use cold buttermilk instead. I find that the buttermilk creates a different texture that works so well with savory crusts. Use the buttermilk. If you don’t have any buttermilk on hand, you can make your own at home! What?!?! What is this madness you speak of? Add a tablespoon of white wine vinegar or lemon juice to whole milk and let it stand for about 10 minutes. Presto! Instant buttermilk.**
Add the egg yolks to the buttermilk.


Whisk the egg yolks and milk together until completely smooth.


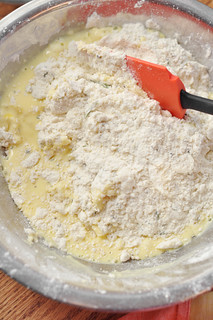
Pour the milk and egg mixture into the dry ingredients.


Stir the milk into the flour until the dough comes together. Then use your hands—just get those paws in there and work it—to bring the dough together.
**Tip: It might appear dry at first but if you keep lightly kneading the dough, it will come together. Trust me. If it doesn’t come together, add a splash more buttermilk and knead until it does.**


The best part about this dough, aside from the awesome taste of course, is the specks of black pepper and rosemary all throughout. It just looks really awesome. Am I right ladies and gentlemen?

Form the dough into a disk and wrap it tightly in plastic wrap. Pop it into the fridge to chill for at least an hour. Longer would be better but I know we don’t always have that kind of time. At the very least, a minimum of 40 minutes, if you’re in a rush. But that’s my limit. Not a minute less. It’s important for the dough to rest because it allows the butter to chill again.

While the dough is chilling, let’s make the filling. We’re going to be doing a lot of chopping and peeling and seeding and more chopping, so get ready. Are you ready? Tell me you’re ready. Scream it out from the top of your lungs. But not if you’re at work reading this or at the supermarket waiting in line because that would be weird and people would look at you like you’re crazy and people don’t forget that sort of thing, so you’ll be known as crazy for the rest of your life. No bueno.
Peel a few carrots.

Cut off the ends of each and then give the carrots a dice. You want the pieces to be around a medium dice.
**Tip: Don’t cut the veggies too small because they’ll disintegrate and burn in the oven while they roast. Don’t cut them too large either because then they’ll never roast. Also keep in mind that all the veggies should be cut similar in size so that they cook at the same time.**

Next up is a butternut squash. How do you peel a butternut squash you might ask?! It can be very daunting to see a butternut squash and not know where to begin. How do you tackle this weirdly shaped vegetable? Well stop worrying. Don’t panic. Take a deep breath. It’s actually quite simple. I like to cut off both ends. This makes the squash more stable to cut through, prevents it from rolling around which is dangerous. Dangerous I tell you!
Then I stand it up and peel the squash, carefully because it can get slippery.
Once it is peeled, cut the squash in half and scoop out the seeds with a spoon. A spoon helps a lot, but you can use your fingers if you’d like. I’m not judging.


Cut each half into strips and then into a medium dice, similar to the size of the carrots.
Easy right? You’ll be a butternut squashing cutting and peeling and seeding pro in no time.

Let’s now tackle the pumpkin in the same way.
You’re going to need a small baking pumpkin. Don’t try to do this with one of those large pumpkins, the ones we cut into jack-o-lanterns. One; that’s a lot of pumpkin and two; there’s not enough flesh in those. So a small baking pumpkin is the way to go. Don’t laugh, because I’m sure people think they can bake with those big ol’ punkins.
I cut it in the same way as the butternut squash. Cut off both ends to make it more sturdy, and then peel it. Be very careful with the pumpkin as it can be tricky to peel. Make sure you have a good peeler on hand. Then cut in half and scoop out the seeds and stringy bits with a spoon. Or your paws (no judgment!!!)


Just like before, cut the pumpkin halves into strips and then into a medium dice.

The next thing we need to prep are the Brussels sprouts. I love Brussels sprouts. They’re my favorite thing at the Thanksgiving table. End of story, just thought you’d like to know.
I tackle these by cutting off the root end and then peeling the first few layers, those are usually dirty and beat up. Not to mention, I find those to be somewhat bitter.
After that, you can cut the sprouts into quarters.


Next up is the cauliflower. I happen to love cauliflower. It’s one of my favorite, if not ALL TIME favorite, vegetables. Most people don’t seem to like it, but I think they just haven’t had it the right way. Perhaps you’ve only tried it steamed. BORING. Steamed vegetables shouldn’t exist! Try roasting the cauliflower in the oven instead. It will change your life forever. FOREVER I tell you. Anyhow, where was I? So cut the cauliflower into small florets.

Place all the cut veggies onto a baking sheet.
**Note: You might need two baking sheets depending on their size and the size of the veggies. It’s important to not over crowd the baking sheets as that will prevent the veggies from roasting properly. It’ll create too much moisture. Make sure the veggies are on a single layer and that there’s enough space to shimmy and shake. Two sheets is probably the way to go, just to be on the safe side. It’s better to be safe than sorry (that’s for you mom).**
Toss with olive oil, and season with salt and pepper.


Roast in a 425ºF oven for about 20 to 25 minutes. Halfway through give the veggies a toss and shake. Keep an eye on them, depending on how hot your oven gets. Make sure they get crispy but not burned. Some of mine burnt because I was too busy singing and dancing in the kitchen with the cat. No big deal. I may or may not have also been taking pictures with the cat. I’ll leave that image in your mind (but if you follow me on instagram, you’ll get me).
While the veggies roast, dice a large yellow onion and mince a few garlic cloves.

Heat a large, heavy-duty pot over medium-high heat. Melt a few tablespoons of butter in it and add the onions and garlic.


Sauté for a few minutes until the onions begin to get translucent and soft. Then season with a bit of salt, black pepper and crushed red pepper flakes.


Stir everything together and allow to cook for another 5 minutes until the onions just begin to caramelize.

At this point you can stem a bunch of mushrooms and slice them.
I like to use crimini mushrooms because I feel like they have better flavor than just the regular white button mushrooms. I think these are woodsier. If that makes any sense. Maybe it’s all in my head. But maybe it’s not. Do you really want to take that chance? Cooking is about adding as much flavor whenever possible. Take it from me, these add flavor. The white ones, don’t.

Add the sliced mushrooms to the onions and stir into the butter and allow to cook for a bit.


Cook the mushrooms until they are soft, tender and browned. It should take about 5 minutes. Don’t quote me on that, it could be about 7 minutes.

We’re going to add a few fresh herbs to the veggies at this point. (Fresh herbs from the market, thank you very much).
Chopped fresh rosemary and thyme. I like the flavor they both give to the dish. I think they’re both very comforting herbs and they remind me of fall cooking. Mostly because in the fall I like to make stews and pot roasts. Fresh herbs always enhance those dishes. Their flavors develop the longer the dish cooks. So that’s why I’m adding them to this dish.


Throw in a few dried (or fresh if you can get a hold of it) bay leaves into the pot. Another classic herb for stews and soups.
Give it all a good mix. Allow to cook for a few more minutes to distribute the flavor of the herbs.


We’re going to make a roux now.
**Note: A roux is just a mixture of some kind of fat (usually butter but oil works too) and flour. You cook it together until it smells nutty (for a few seconds) and then you pour in some kind of liquid, usually stock. A roux is a great way to thicken sauces. Especially cheese sauces. Did someone mention Pumpkin Mac and Cheese? Oh I thought you did.**
So move the veggies over to one side of the pot. Just cram them over. “MOVE OVER VEGGIES! GET OUT OF THE WAY!!” That’s what I said to them.
Then melt a pat of butter and add the flour. Stir together and cook for about 30 seconds to develop the flavor of the flour.


Slowly, while stirring constantly, add the vegetable stock. Since I wanted to keep this completely vegetarian, I decided to use vegetable stock. Plus I think it just goes so well with the roasted veggies and the sautéed onions and garlic and mushrooms. If you only have chicken stock on hand, that will work just fine.


Lower the heat to low and allow to simmer for about 10 to 15 minutes. It should thicken up by then.
After it has thickened, remove the bay leaves and check it for seasoning. It might need a tad more salt and black pepper. Adjust accordingly.


At some point the vegetables in the oven should be perfectly roasted. I hope you remembered to keep an eye on them…

Remove the sauce from the stove and add the roasted vegetables to it.

Gently stir or fold in the roasted vegetables, being carefully to not break them up too much. You don’t want them to become mush in the pot.


Most pot pie recipes finish off the sauce with a splash of heavy cream or milk. You could do that if you want, or you can omit it. I like the creaminess factor but didn’t want to use either of those. So I just stirred in a spoonful of greek yogurt. You won’t really taste the yogurt but it will give the sauce a great creaminess without all the guilt.
Add that and the peas. You need peas in a pot pie. It’s a must have. Leaving them out would be blasphemous.
Return to low heat and allow to cook for a few minutes just to heat through the yogurt and peas.


And the filling is done! Boom, just like that, you made a hearty veggie pot pie filling that’s actually good for you. Resist the temptation to just eat it right out of the pot. Okay okay, a few spoonfuls but that’s it. I don’t even want to tell you how much of the filling I ate at this point before even finishing the pot pies. It’s okay, I’m willing to admit that I have no self control when it comes to certain things. This is one of those times.
Set the filling off to the side and allow to cool.
In the meantime, let’s roll out some dough. Remember that black pepper rosemary crust? How could you forget?! I mean….

Place the chilled dough on a lightly floured work surface. Cut the dough into four equal pieces.

Working with one piece at a time, roll it out into a sort of circle shape. It doesn’t have to be perfect, and I’m not just saying that because mine were nowhere near perfect, I’m saying it because it really doesn’t. We’re going to trim the edges anyhow.

Divide the filling evenly among the ramekins or dishes you’ll be baking the pot pies in. Fill the dishes up to the top. Don’t be afraid to get it piled high.


Put together an egg wash, which is just an egg whisked with a splash of water. Then brush edges and sides of the dish. This will allow the dough to stick to the ramekin, creating a seal so that the juices inside don’t run out too much during baking.
Then place the crust over the pot pie and squish the sides together to seal.

Repeat this with the remaining dishes. I had about four very large servings but you can cut the dough into six pieces and make six smaller servings. I also roasted a lot more veggies than I needed to but I enjoyed them the day after. They’re delicious just by themselves as a snack so I recommend roasting extra as well. You can thank me later. Like at the Thanksgiving table, for instance. Just throwing it out there.
Once all the pot pies are topped, make a few tiny slits on the top of each to allow steam to escape when baking.


Brush the crusts liberally with the egg wash. Don’t forget about the sides!


Last thing, right before baking, is to add a sprinkling more of freshly cracked black pepper. I really love black pepper, incase you haven’t noticed that already. I do feel like it gives it that added nice touch at the end once the pot pies are baked. It’s purely just a visual thing. You don’t have to sprinkle any if you don’t want to since there is already black pepper in the crust. But come on, you know you want to.


As you can see, I like to place the pot pies on a baking sheet so as to catch any drips and not have it create a smokey mess in the oven. Also, it’s easier to transport in and out of the oven that way.

Bake in a preheated 375°F oven for about 25 to 30 minutes or until the crusts are golden brown and crusty all around.
Remove from the oven and allow to cool slightly before serving. I like to serve it along side a simple mixed green salad. But what do you like to serve your pot pie with? Leave a comment below and let me know. I’m always looking for suggestions. If you do make a salad, what kind of salad do you make?

If you don’t have small individual ramekins or oven-safe dishes to make these pot pies in, you can easy make one large pot pie instead. Just pour the filling into a large and deep pie pan or 9×13 rectangle baking dish. Don’t divide the dough and just roll it out as one entire piece. You can easily do it that way and just serve everyone from that one dish.
I like the individual servings because it looks nice, but also because everyone gets the perfect crust to filling ratio and no one is fighting for the crusty corners (and by no one I mean me) or no one feels robbed from the center pieces (again me). Its a win-win this way.


You already know what I’m about to say and I feel like I shouldn’t even have to say it BUT I’ll say it anyway, the crust is the best part of this dish for me. It’s seriously the flakiest crust and perfect for the creamy hearty filling of the pot pie. The black pepper and rosemary really compliment the woodsy rustic flavors in the rest of the recipe.
Now I know we don’t always have the time to make our own crusts, I’m no fool, sometimes we just don’t have time during the week. What I want to say is “Well you better make time for this crust!” But that’s so rude. You have two options here. You can either, make the crust dough a few days in advance and just keep it in the fridge until ready to use.
Or you can opt out for some store bought help. Puff pastry will work the same way. It won’t give you the same flavor but in a bind it’ll come in handy. Just thaw out the puff pastry, roll out and cut, and brush with egg wash in the same way and you’ll be good to go.
But if you do have the time and the willingness to make your own dough, well then I highly recommend it because this crust cannot be beat.

You can definitely make these and put them together a day in advance. For instance, if you have time on let’s say a Sunday, make the pot pies. Fill them with the hearty irresistible filling. Top them with the addicting crust and then cover them. Store the pot pies in the fridge and then on Monday or Tuesday, you can remove them from the fridge. Brush them with egg wash. Sprinkle with black pepper, and bake them off. It might take a little longer because they’ll be going from the fridge to the oven but you won’t have to do much work other than that. Just pop them in the oven and go about your business. Dinner will be served in no time. Enjoy!

[print_this]

Roasted Autumn Vegetable Pot Pies
This vegetarian dish is so versatile and perfect for the autumn months when the weather is cold and you need something to warm up the house and yourself. You can swap out any of the veggies here with your favorites. If you don’t care for one of the autumn vegetables used in this recipe, then just feel free to use something else or leave it out. It’s so simple to make that you can change it a million different ways. Not feeling the vegetarian kick? Then add chunks of chicken and use chicken stock instead. Whatever the case might be, you won’t be able to resist the comfort they’ll fill you with and the warmth it’ll bring to your house.
yield: 4 individual pot pies
Ingredients:
- 1 small butternut squash (or half of a large one) peeled, seeded and diced
- 1 small baking pumpkin (or half of a large one) peeled, seeded and diced
- 2 large carrots, peeled and diced
- ½ pound Brussels sprouts, trimmed and quartered
- 1 small cauliflower (or half of a large one) cut into chunks
- 2 tablespoons olive oil
- kosher salt
- freshly cracked black pepper
- pinch of crushed red pepper flakes
- 3 tablespoons unsalted butter
- 1 large yellow onion, diced
- 4 garlic cloves, minced
- 1 pound crimini mushrooms, stemmed and sliced
- 2 dried bay leaves
- 1 teaspoon fresh thyme, chopped
- 1 teaspoon fresh rosemary, chopped
- 3 tablespoons all-purpose flour
- 2 cups vegetable stock
- ½ cup greek yogurt
- ¾ cup frozen peas, thawed
- black pepper rosemary crust (recipe follows)
- 1 egg, whisked with a splash of water
Preparation:
1. Preheat oven to 425℉.
2. Divide the diced butternut squash, pumpkin, carrots, Brussels sprouts, and cauliflower between two large baking sheets. Drizzle with olive oil and season with salt and black pepper. Give the veggies a toss to evenly coat and roast in the oven for about 20 to 25 minutes or until the veggies are golden brown and crispy. Halfway through roasting, give the veggies a toss. Once roasted, remove from the oven and allow to cool on baking sheets. Lower temperature to 375℉.
3. Heat a large heavy-duty pot over medium-high heat. Melt 2 tablespoons of butter and add the chopped onions and garlic. Sauté for about 5 minutes or until the onions begin to soften and get translucent. Season with salt, black pepper, and a pinch of crushed red pepper flakes. Stir and continue to cook until they just caramelize. Add the sliced mushrooms and cook for another 5 minutes, until they have browned. Stir in the chopped thyme, rosemary and dried bay leaves. Cook for another 5 minutes. Move the veggies to one side of the pot and add the remaining 1 tablespoon butter. Melt and then add the flour. Stir and cook for about 30 seconds. Slowly add the vegetable stock, stirring the entire time to evenly combine everything together. Lower the heat and allow to thicken about 10 to 15 minutes. Check for seasoning and adjust accordingly with salt and black pepper. Stir in the roasted vegetables from earlier. Add the greek yogurt and frozen peas, stir together and cook for another minute. Remove from heat and allow to cool slightly.
4. On a lightly floured work surface, cut the dough into four even pieces. Working with one piece at a time, roll out the dough into a circle. Trim the edges to create a clean circle. and Repeat with the remaining pieces. Divide the filling evenly among the ramekins or baking dishes. Don’t be afraid to really mound up the filling, it will be thick enough to not spill over. Top each pot pie with the rolled out crusts. Brush the edges of the dishes with egg wash to create a seal between the crust and dish. This will prevent any leakage. Place the pot pies on a baking sheet. Make a few small slits, with a knife, on the top of each crust to allow steam to escape while baking. Brush the pot pies liberally with egg wash and sprinkle with freshly cracked black pepper if you wish. Bake for 25 to 30 minutes or until golden brown and flaky. Remove from oven and allow to cool slightly before serving. Enjoy!
[/print_this]
[print_this]
Black Pepper Rosemary Crust
If you’re not a fan of black pepper and/or rosemary you can feel free to leave those two ingredients out. The crust will still be buttery and flaky and delicious. If you want to switch things up, you can add shredded sharp cheddar cheese to the dry ingredients or even bacon, but that defeats the vegetarian purpose of this dish. But why not go all out if you don’t care about that sort of stuff?
yield: enough dough for 4 to 6 pot pies
Ingredients:
- 2 cups all-purpose flour
- ½ teaspoon baking powder
- ½ teaspoon salt
- 1 tablespoon freshly cracked black pepper
- 1 tablespoon fresh rosemary, chopped
- ½ cup (1 stick) unsalted butter, very cold and diced
- 2 egg yolks
- ¼ cup buttermilk
Preparation:
1. In a large bowl, whisk together the flour, baking powder, salt, black pepper and rosemary. Add the cold butter and rub with your fingers (or cut with a pastry cutter) until the butter breaks down and resembles coarse crumbs the size of peas.
2. In a small bowl or measuring cup, whisk together the egg yolks and milk. Add it to the flour and stir with a rubber spatula until the dough comes together. Use your hands to shape the dough into a disk. If you find the dough to be too dry, add a splash more buttermilk. Cover with plastic wrap and chill for at least 1 hour. Can be made up to 2 days in advance. Allow to thaw a bit before rolling out.
[/print_this]
This is all kinds of perfect. There are so many fabulous vegetables in here!!
This is one of those recipes that’s absolutely perrrrrfect for the fall. I have bumped this up my to do list 🙂
These pot pies look incredible! I love how you jazzed up the pie dough. Brilliant!
These look delicious! I am a vegetarian and I’m always looking for new and exciting meals, so thank you for this!
ps. I’m now going to find you on Instagram so that I can see the photos of the cat.
That dough looks so fragrant and amazing. As a vegetarian, I’m glad you posted this!
I think I’m in love with you. Also, I like to substitute the pumpkin for roasted turnips and potatoes.Because why not, I say.
Love your step by step photography! what a great way to eat so many veggies in one dish! First time on your blog and I am loving it:)
Oh hello. This pot pie made me have an insta-crush on you.
This will be on my table for dinns Sunday night! Woot!
Your photos are beautiful, the recipe looks delicious, and I am going to make it immediately! I’ve been on the hunt for an excellent veggie pot pie. Thanks for sharing!
This looks delicious! Out of curiosity, how large were your ramekins? I’m trying to figure out what size dish I ought to make this in (and therefore how many pieces to divide the dough into). Thanks!
Mine were about 3inches, I believe!
Wow, your kitchen looks like Joy the Baker’s kitchen! And I mean that in the most flattering way possible. Also this is so timely because I just tried a vegetarian pot pie and the filling was totally meh. Gonna try this next!
I was cat sitting for her, so I decided to shoot a post while there. Good eye. Let me know what you think!
I made a similar pie using your recipe as a guide. I used sweet potatoes, cabbage, turnips, criminis and red potatoes; I had these on-hand but forgot my carrots! I used store-bought puff pastry and added herbs. In spite of my short falls, it was divine! I am experimenting to see if a prepared pie can be frozen and baked, as you described, but from the freezer. I plan to make it again and look forward to adding butternut squash! I might even try the scratch crust, but probably not. Thanks so much for the lovely step by step photos!
I can’t get over your gorgeous photography!
Thank you SO MUCH for this! I made it today on a cold spring day (following the winter-that-wouldn’t-end) but used different veggies: potatoes, carrots, celeriac, fennel, garlic, onions. I roasted everything, then mixed in a sauce that I made using white wine and broth. Baked it in a deep dish pie plate + one souffle bowl. Your crust recipe is fabulous and a work of art to behold. Very gourmet. Very comfort. I appreciate everything you brought to this: photos, writing that was both witty and precise, and wonderful recipe.
Do you mind sharing your white wine sauce? Was that part of the roux?
I know it’s not fall, but I made these for dinner tonight and they were amazing!! I had to sub out a couple of the veggies because they weren’t available in the store (oddly enough I found pumpkin), and added a 1/2 tsp nutmeg to the mix. Fantastic recipe. Thank you so much!
This was the most delicious pot pie I’ve ever eaten! I think the yogurt adds a nice tang and robust flavor that I’ve never tasted before in a pot pie. I will definitely make again, or maybe just eat the filling because it is just that delicious!
I made this for our fall harvest feast–it was amazing!!
I”m so glad you enjoyed it!! Now, I want a fall harvest feast!
What size ramkins should one use for this recipe?
4-inch ramekins!
Amazing post!!! This look delicious! I have to try it!
Thank you for share it!
Regards from Barcelona!
Oh my gosh, so good. Especially that crust! I eliminated the pumpkin and increased the brussels. Next time I might swap the carrots for parsnips and bake it in one big pan to get more crust!
Just discovered your site, and I can tell I’m going to be a regular. Made this pot pie tonight and loved it. Thank you for the encouragement to make our own crusts. I usually buy frozen pie shells, but a homemade crust was a nice extra touch that didn’t require a lot of extra effort.
Beautifully photographed and I actually laughed at your commentary. I’m now hungry and wishing it was autumn! Thank you for this wonderful recipe, it was a lovely read x
I just made this and am wondering if you have the nutritional info without the bread? Thanks!
I just made these pot pies for dinner and they are the bomb! So freakin good thanks for sharing! I will definitely have to make the crust next time.
Wow! This was great – the best chicken (yes I know it’s a vegetarian recipe) pot pie I’ve ever made. I had leftover roasted chicken, and acorn squash (from our garden) and cauliflower and mushrooms on hand, and rosemary, sage and thyme from my herb garden (don’t hate me, Jonathan). Pretty much followed the recipe, except I made one large pot pie; I also had plain low-far yogurt in my fridge, not Greek. The depth of flavor that roasting the vegetables produced was exceptional. I made this without leaving my house to grocery shop – a testament to the versatility (I had a leek that I added to the roasted vegetables, but no brussel sprouts) and adaptability of this recipe. Thank you from the bottom of my heart.
Hi Eugenia, this message makes me so happy! I’m so glad you played around with the recipe! That’s the whole point, to customize it to what you have on hand. I’m glad yo enjoyed it! Truthfully, I’d add chicken too if I had it on hand! Wink wink.
I’m curious if you had good results with freezing. I need to take one to a party in two days but only have time to make it today. thanks.
Hello Bess! I have freezed it before and it works great! Make it completely and then let it cool to room temperature, then wrap and place in the freezer. Then when ready to reheat, remove the plastic wrap, cover with foil and bake for 25 to 30 minutes in a preheated 350 degree oven!
I’m new to your blog, I happened across it on Pinterest and I’m SO glad I did! This recipe looks amazing, but besides that, I absolutely enjoyed reading the post. You’re hysterically funny! I love it! And this pot pie… OMG! Can not wait to try this! It looks amazing, delicious, beautiful, YUM! I’m not a vegetarian either, but once in awhile I like a meatless dish. Thanks for sharing this!
hi, how many does it serve??
This is so beautiful and looks DELICIOUS!! I can’t wait to give it a try!! Do you think you could do a crockpot version of this recipe? Do you think that would work? Or do you think it would make the squashes too mushy?
I have a recipe from years ago that uses pumpkin I always use large pumpkins. A) cheaper B) Libby’s Hello
I have a giant garden, including all the perfect herbs! Imma make this recipe for SURE!!
Let’s not scare people away by saying it takes 4.5 hours to make. I roasted veggies in the morning, made the mushroom cream sauce and baked the pie that evening. I thought it was divine. I made it vegan for someone who didn’t appreciate the effort, so I purchased a pre-made vegan pie crust ($$$). It was well worth the cash, was a huge time saver, and maybe next time I will be inspired make my own seasoned crust. Try this recipe, save time where you can. It is well worth it.
This looks so good! What a perfect dinner for the cold months!