
Everyone, take a moment right now to scream out loud to no one in particular, and to anyone who is listening that bread is the greatest thing in the world. Do it not because I’m telling you to, but because I totally just did it myself. I yelled out to the world—well to those in my close vicinity anyway—that bread makes the world go ’round and I’d be lost without it. It’s true. I would be lost without it. I have a confession to make. It’s not that strangers now think I’m crazy, no, my confession is that I could eat bread for the rest of my life and I wouldn’t be sad about it. Not for a second. I’d actually be the happiest bread eating individual out there. I’d be like Aladdin stealing a loaf of bread because it’s filling and delicious. Only I wouldn’t give it to my pet monkey because one, I don’t have a pet monkey and two, even if I had a pet monkey, I wouldn’t share. What? It’s bread, don’t look at me like that. Hide your bread from me my friends, because it’ll be gone quicker than you can say, “Hey! That’s my bread, put down the butter and loaf and walk away slowly.” No I won’t walk away slowly. In fact, I’ll eat the bread faster and right in front of your face too because it’s bread and how could you possibly put it down and turn your back on it? That’s blasphemous.
My love for bread isn’t the guilty kind of love that I feel the need to hide like a sick love affair. No, it’s the kind of love that requires me to go on rooftops and scream out at the top of my lungs that bread and I were meant to be together until the end of my days. It’s the kind of love that requires my full undivided attention. The kind of torrid love that I feel the need to devour every single day of my life. It’s also the kind of love that I feel the need to flaunt and tell everyone about because I want to make them jealous. Jealous that I have freshly baked bread and a stick of butter that requires eating and perhaps they aren’t as fortunate.
I’m the kind of person that carries bread in my back pocket for a light afternoon snack. That’s a lie, I really don’t carry bread in my back pocket. That’s just plain silly. Who’s ever heard of such a thing? I carry it in my front pocket, it gets less squished there. I’m the kind of person that would scoop up the bread off the ground right before the pigeons get it. I’d fight off a seagull for the bread in it’s beak. That’s only a partial lie. You know what isn’t a lie though, I’m the kind of person who will eat bread for dinner with rice and mashed potatoes because we all know, deep down inside, that potatoes are a vegetable and shouldn’t be counted as a starch. Carb on top of carb on top of carb is the only way to go, in my book. I’m living life right. I’m also the kind of person that doesn’t like to share my bread. We already knew that though. But lucky for you, here’s a recipe for my favorite bread so you can make it for yourself. Soft pillowy challah bread sliced and eaten with, eaten with…well just eaten period. And even luckier (that’s totally a word) for you, this recipe makes two loaves. TWO. LOAVES. You’re welcome.
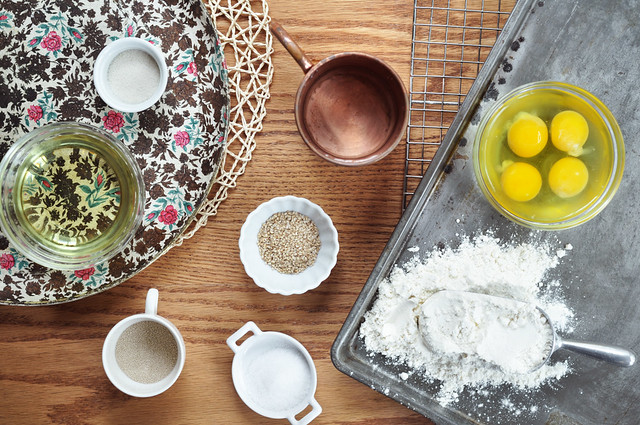
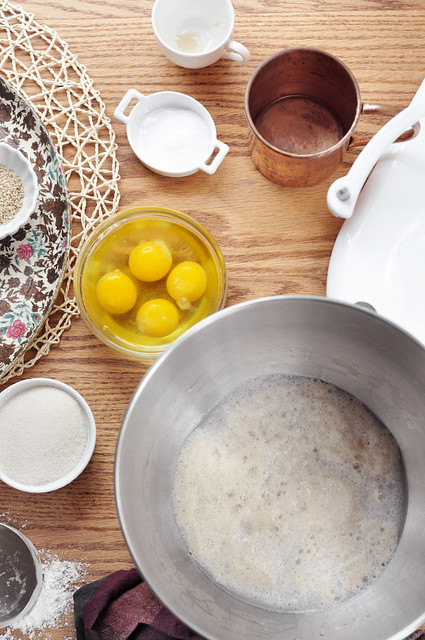
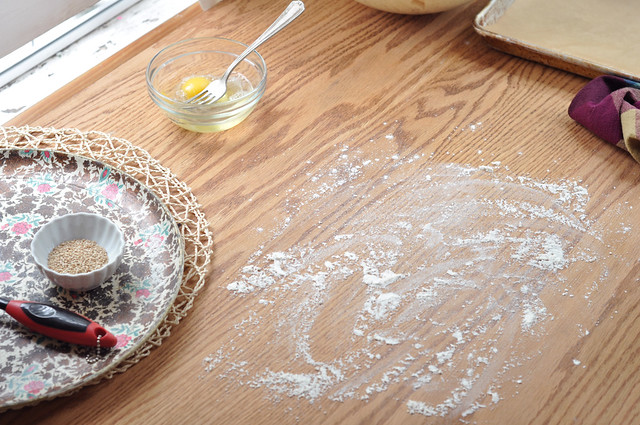
Let’s start by waking up the yeast. It’s active dry yeast so we need to feed it and make it do it’s yeasty magic thang. In a small bowl, add the yeast.
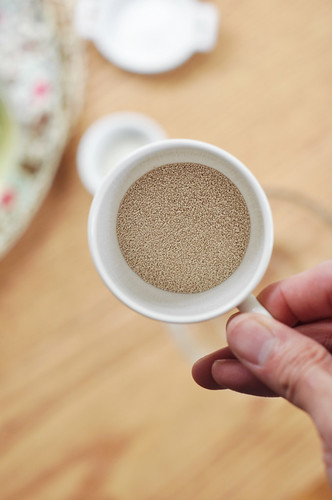
Yeast, much like you and I, needs food in order to grow and work properly. And much like you and I, but probably only me, it loves to eat nothing but sugar or honey. This time around I’m feeding it sugar. What’s that yeast? You like sugar? Me too, my delicious smelling friend. Me too.
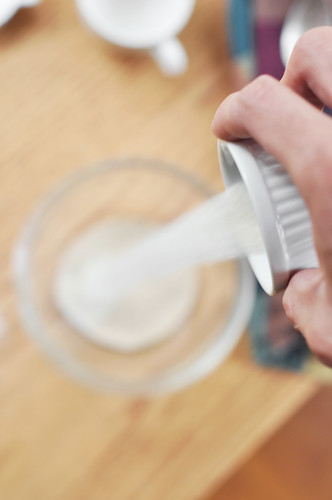
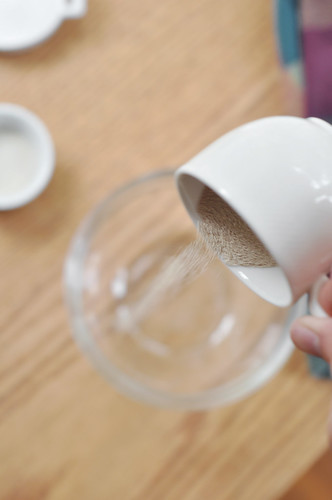
Add the warm water to it.
**Tip: Make sure the water is warm—not too hot but not too cold—enough to waken up the dry yeast. It should be around 110°F degrees, if you’re into thermometers and such.**
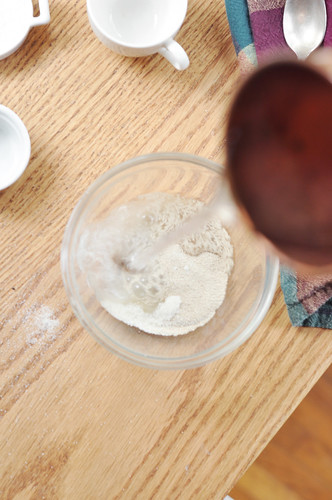
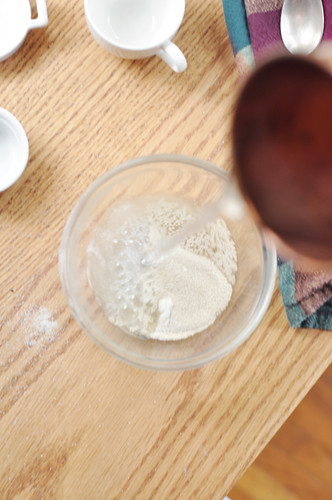
Give it a gentle stir with a spoon or something, and allow it to set, untouched, in a warm place (like an oven that is turned off for instance, that’s warm enough) for about 15 minutes. The yeast mixture should bubble and foam up, that’s how you know you’ve woken up the yeast.
**Note: If it isn’t foamy and frothy, then discard and start over. Yes you read that right. Chuck it. It’s crucial to the bread making process that this step be done right.**
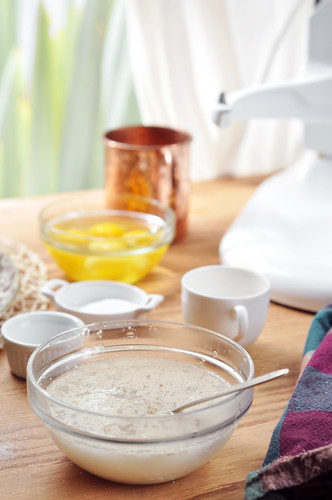

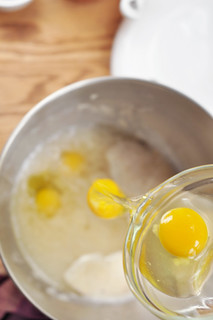
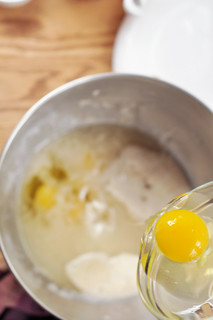
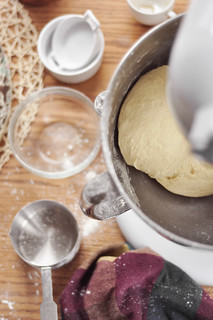
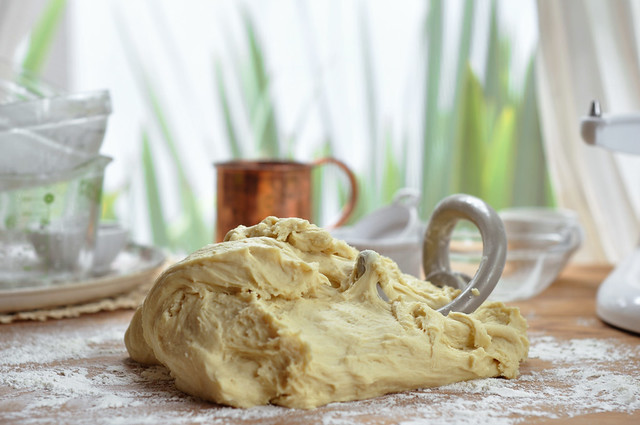
Once the yeast is foamy and ready to go, pour it into a bowl of a stand mixer or a large mixing bowl if you feel like doing it by hand. I have to warn you though, this is a beast of a dough and you’ll need lots of elbow grease to get this going. But you can do it, I have faith in you.
Then start adding the remaining ingredients.
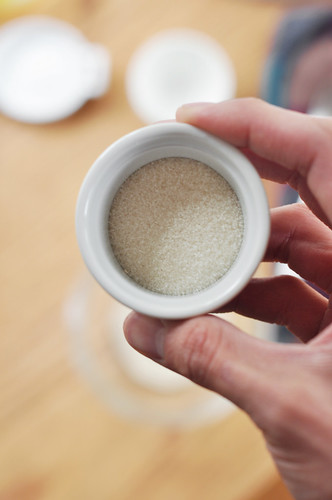
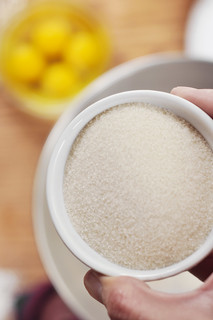
Sugar
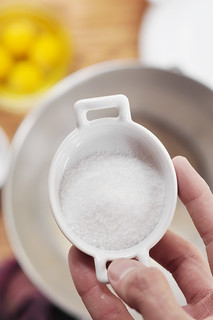
Salt (don’t be worried with how much salt is going in, it makes two whole loaves remember?)
Oil

Throw in the eggs.
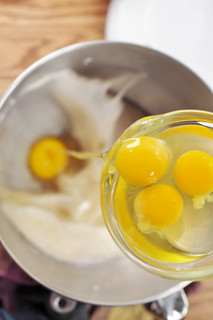
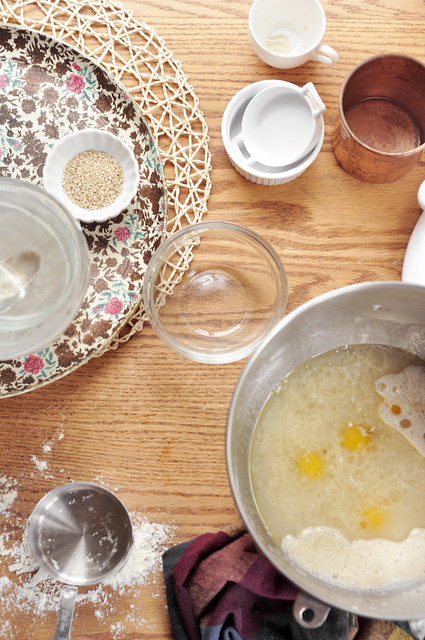
Mix the ingredients together, starting on low so that it doesn’t splash everywhere. Stir until completely whisked together.

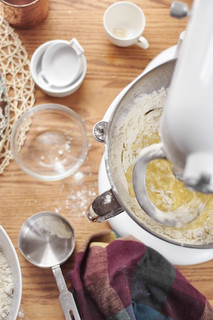
While the mixer is running on low, slowly begin to add the flour, one scoop at time.
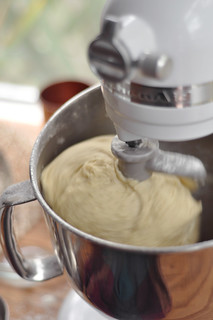
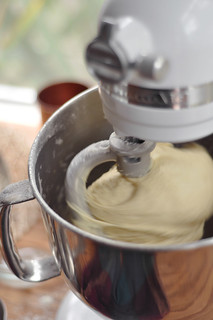
Continue to add the flour until the dough comes together and forms a smooth, slightly sticky dough that comes clean off the sides of the bowl.

Knead the dough with the dough hook attachment for about 5 to 7 minutes until smooth and soft. Or knead it by hand, on a lightly floured work surface for 5 to 7 minutes until smooth and soft.
**Tip: It is a lot of dough because it yields two loaves, so if you find that your mixer isn’t strong enough or it isn’t getting the kneading job done, you can turn out the dough onto a lightly floured work surface and knead it by hand. It’ll take some strength and dedication but you can do it!**

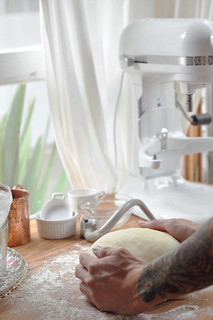
I don’t have the strength or the patience to knead this entire dough by hand. So I used a heavy duty kitchen aid mixer. The larger professional kind. It got the job done without having me break a sweat.
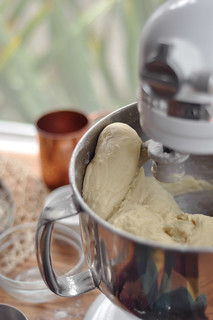
Now that you’ve attacked and beaten up the dough it actually needs to rest and do its dough magic thing. If you used the mixer, now you can turn out the dough onto a lightly floured work surface. Knead it a few times, just a couple kneads to bring it together and form the dough into a large ball.
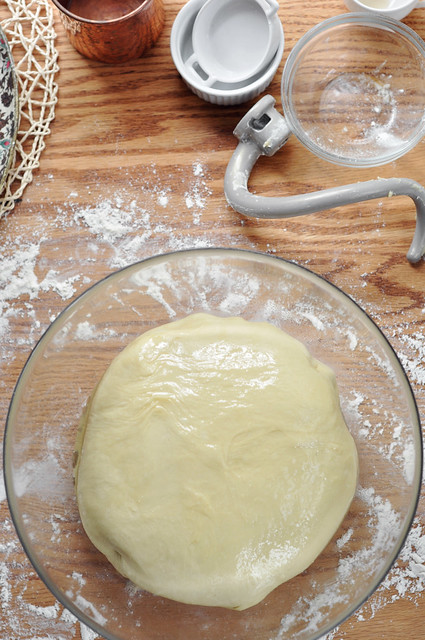
Form the dough into a ball and then dump it into an oiled bowl. Flip it over to coat both sides.


**Note: Make sure it’s a large bowl, big enough to hold the dough and still have room to rise and grow. You don’t want to use a tiny bowl and then have it be like that I Love Lucy episode where she is making bread and the dough grows out of control. Funny as that might be.**
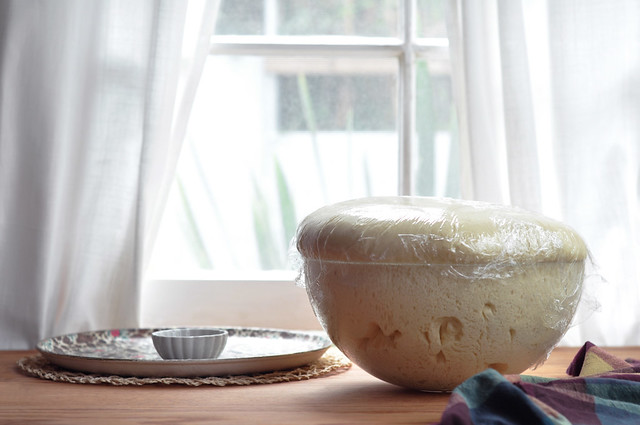
Cover the dough loosely with plastic wrap and a damp kitchen towel. Place the bowl in a warm place and allow it to rest until doubled in size, about 1 hour.
**Tip: I like to place the dough in an oven, that is turned off, to rest there. I find it to be the perfect place for proofing dough as it’s warm enough and dark and cozy.**
After 1 hour, punch the dough down, cover again and allow to rest for 30 more minutes. This step is important so don’t skip it thinking it won’t make a difference. I’ll know you didn’t do it. It makes all the difference.
After those final 30 minutes your dough will rise beautifully and look like it’s tripled in size. That’s okay, that’s what you want.
Let’s form some challah loaves shall we?
Lightly flour a work surface.
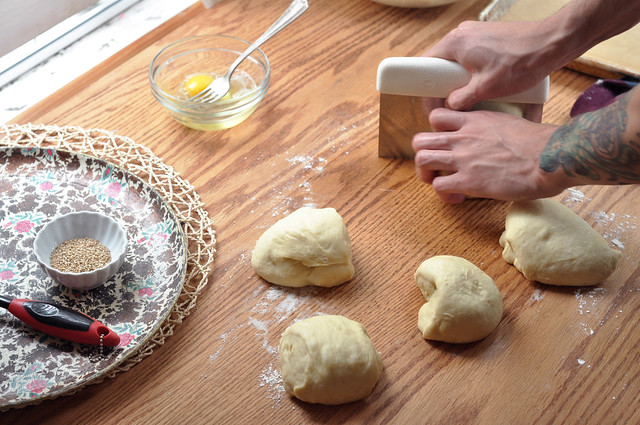
Place the dough onto it and cut it in half. Just eyeball the size and make sure the two halves are somewhat similar in size. It doesn’t have to be perfect, but make sure it is.
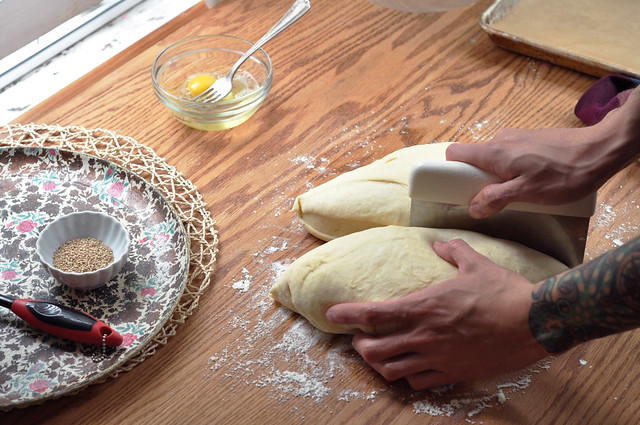
We’re going to work with one half at a time. Each half will make one loaf.
Place one of the dough halves back into the bowl and cover it so that it doesn’t dry out while we work with the first half.
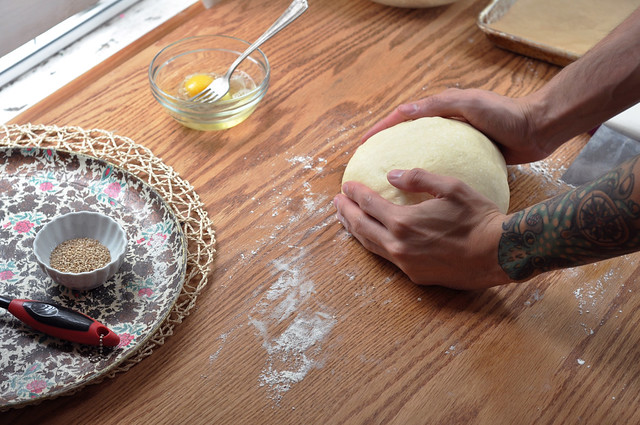
Roll the one half into a smooth and tight ball.
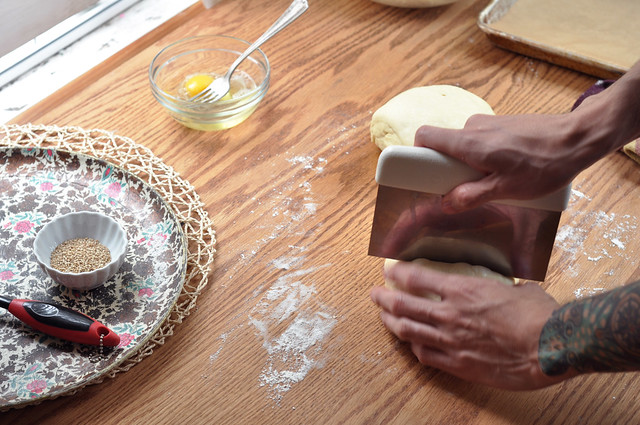
Cut the dough ball in half.

Then cut each half in thirds so you end up with 6 even pieces.
Begin to roll out each of the dough balls into long ropes.

They should be about 12 inches long. Don’t worry about making them perfectly even in width, just make sure they look about the same size in length.
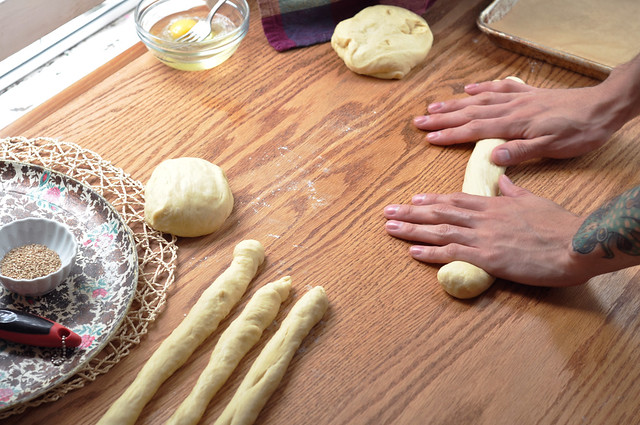
Continue to roll out each piece until you end up with 6 long strips of dough.
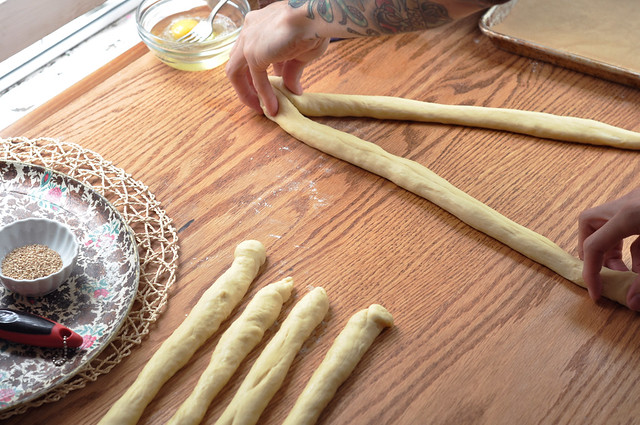
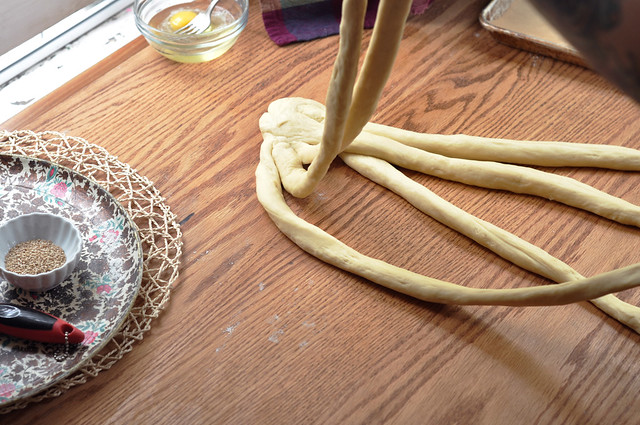
Then pinch them all together at the top, spreading out the ropes like tentacles.

There are different ways to braid a challah loaf. There’s a four braid technique that is a little easier, you might want to start with that if you’ve never braided a challah before and it seems daunting to you. It’ll still be just as tasty and awesome looking.
If you feel a little daring and want to just go all the way, then you can make the six braid loaf, like I did.
I’m going to warn you right off the bat that I’ll probably do one of two things, I’ll either confuse the heck out of you and you’ll be like “Huh? What did he just say?” or you’ll completely get my lack of explaining and it’ll make perfect sense. “That Jonathan, he’s a genius!” We’ll see where this leads to.
You start with the furtherest rope on the right, the very last one.
Pick up the two to the left of it.
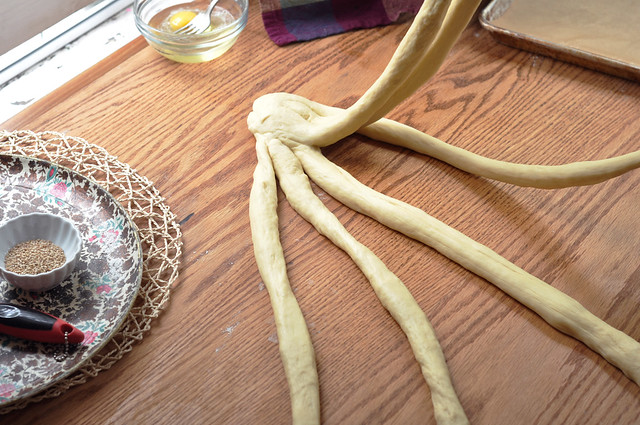
Drag that last rope underneath the two ropes you’re holding and place it in the center.
Then repeat this process with the left side. Pick up the two ropes that are next to the last one on the left. (Oy I’m already confusing myself!)
Then grab the left rope under the two you’re holding and place it in the center.
Twist the two center ropes once, those are the ropes you’ve dragged underneath, right?

Then start to repeat those steps, picking up the two ropes next to the last one on the right, dragging underneath the last one to the center.

Then doing the same with the left side again.
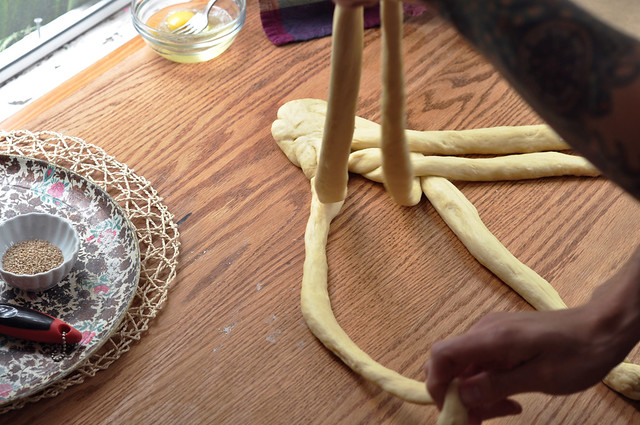
Twist the center two once again.
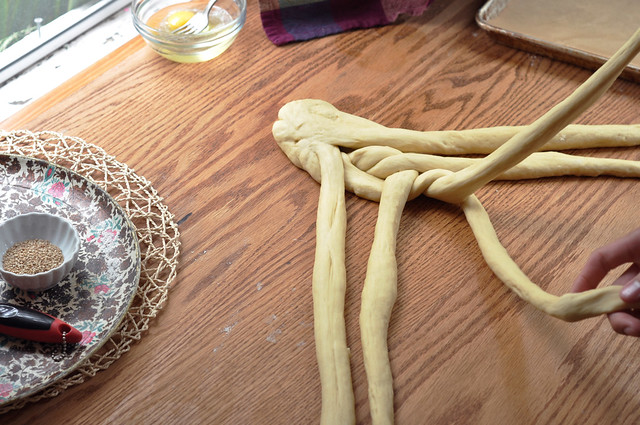
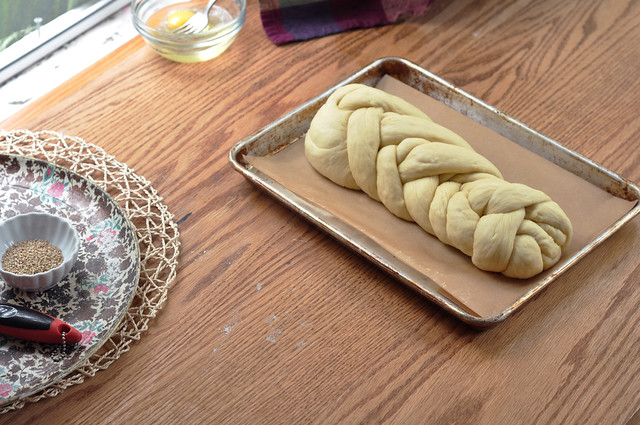
Continue this process until the entire loaf is braided. Tuck the ends underneath to create a perfectly shaped straight loaf.
You can also twist it together to make a circular challah loaf. That’s popular too.
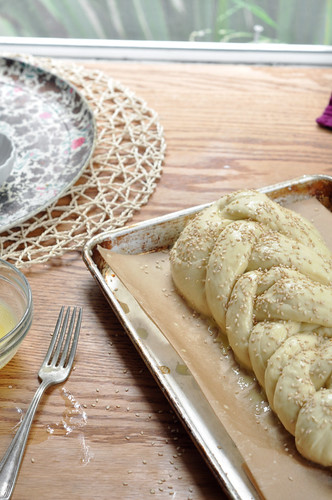
Place the challah onto a baking sheet, lined with parchment paper.
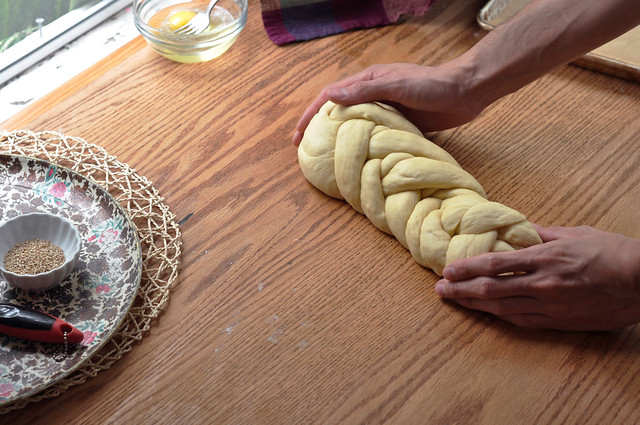
Repeat the entire process from start to finish, with the second half of the dough, to create two challah loaves.
Place them on two separate baking sheets though, so that they don’t bake onto each other.
Once both loaves are braided they are almost ready to hit the oven. Almost.
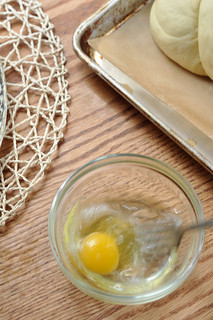
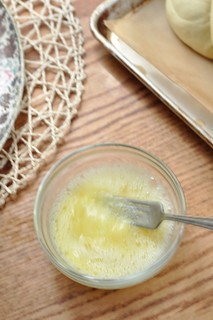
Before we can bake them off, we need to make an egg wash to brush them with.
**Tip: If you didn’t quite get the explanation, I don’t blame you and you should total go on the internets to find a video or better tutorial.**
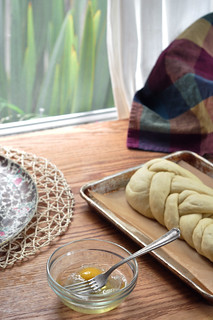
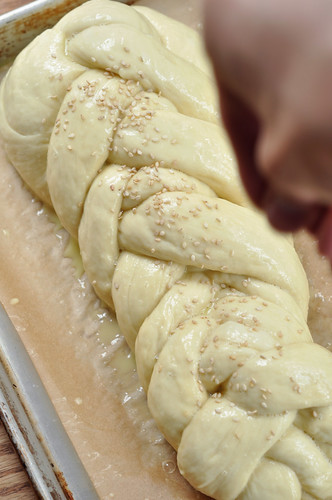
Brush the two loaves entirely with the egg wash, making sure to coat the sides and ends as well.
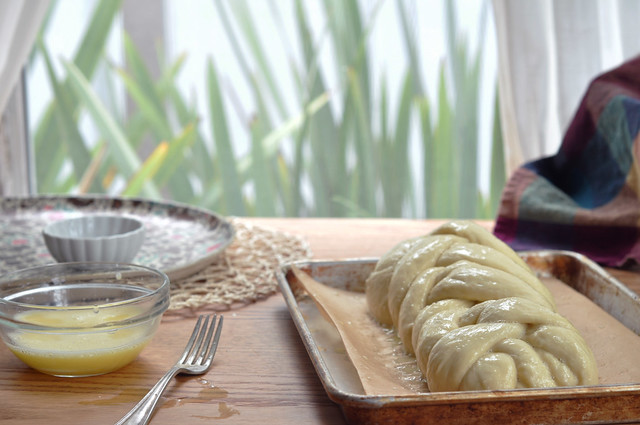
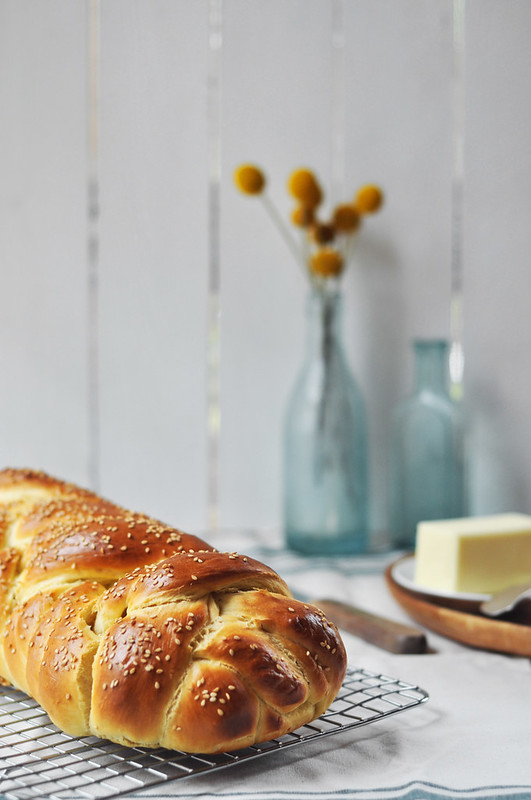
Then sprinkle the loaves, if you wish, with sesame seeds, poppy seeds or coarse sea salt. It’s up to you which you’d like to sprinkle, of course you don’t have to sprinkle it with anything, the challah will be just as tasty plain.
I sprinkled one loaf with sesame seeds.
I left the second loaf plain because I’m going to turn it into another recipe (the next post) and it’s better if it remains plain.
I won’t tell you what the post will be because I don’t want to spoil the surprise, but it’s something super delicious. You’ll have to wait for the next post, although if you really really just want to know and can’t wait, I’m sure you can find it out there in the internet. I’ve dropped clues. I’ve dropped hints. Maybe shared a few images.
Bake the loaves in a preheated 375°F oven for 35 to 40 minutes. Make sure to turn the baking sheets halfway to ensure even browning. The bread should be about 190° inside, which you can check with a thermometer if you wish. It should be golden brown all around.
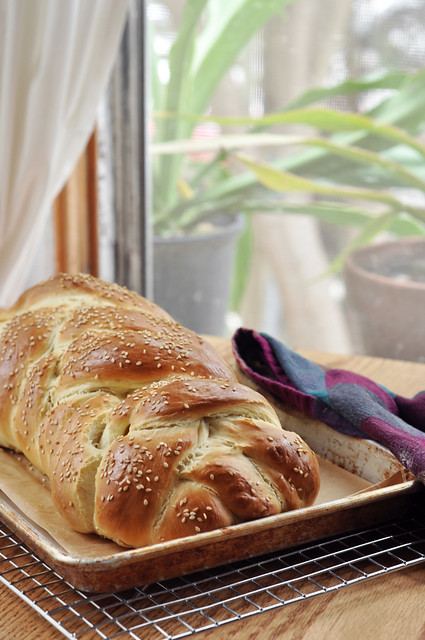
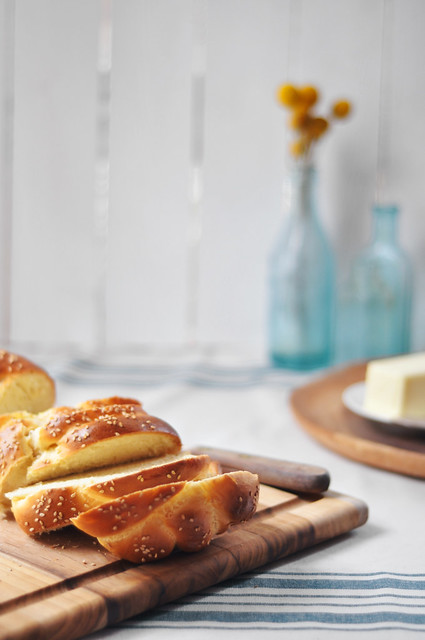
Allow the challah to cool on a wire rack before slicing and serving and eating.
You’ll notice the bread will be crusty when you tap it, as it cools it will begin to soften, leaving you with a moist and chewy challah bread.
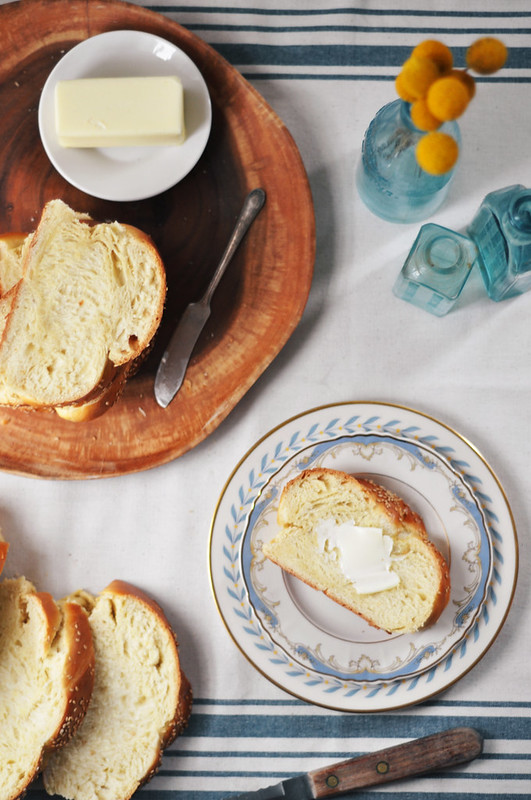
You can slice it as thick or as thin as you’d like, depending on what you’re going to do with it. I mean you’re going to eat it, of course, but how will you eat it, is the question. You can slice it and serve it along side your dinner, whatever that might be. It goes with pretty much anything. You can also use it as sandwich bread and make delicious sandwiches with it. Wait, grilled cheeses. Wait, panini.
A friend of mine once said that they should make challah bread into pillows. We laughed about it, but deep down inside we both knew that we really wished there was such a thing. Challah bread pillows to rest your head on at night, can you imagine? My pillows would never last, I’m sure I’d wake up in the morning, pillow missing, crumbs everywhere and for some odd reason I wouldn’t be hungry for breakfast.
This soft challah bread could most definitely be my pillow any day or night. I wouldn’t complain.


I didn’t make this loaf into sandwiches. Neither did I serve it alongside dinner. I actually just sliced it (for the images) slapped some butter on (for the images) and ate it slowly, one piece at a time, pretty much in one sitting (for the images, of course).
It’s seriously the most delicious bread you’ll ever have. Probably even more delicious than our Rosemary Parmesan Focaccia Bread. But it’s a close call and I think you should just make both and judge for yourself. Call it a bread party and invite me over.

However you decide to eat it, one thing is clear, you have to, just have to, make it for yourself. Don’t let the long resting time, or long kneading deter you from making such a wonderful treat. Think of the endless possibilities you have when it comes to homemade challah. Also, you can feel really good about making sandwiches for yourself or your family, knowing that it’s all natural and homemade with love. Get in the kitchen with your kids and have some fun making bread. You’ll love it. They’ll love it.
Stay tuned for the upcoming post. You’ll be so thankful this recipe gives you two loaves because we’re turning this bread into a delicious breakfast favorite. You won’t want to miss it. It’s coming very soon.
[print_this]

Challah
Recipe taken and adapted from Jewish Holiday Cookbook
This easy homemade bread is perfect for just about all your sliced bread needs. Whether you make simple sandwiches, grilled cheeses, panini, serve it sliced with dinner, or just by itself as a snack, you’ll be left wanting more. It’s a great recipe to make on the weekend so you can have homemade challah throughout the week.
yield: 2 loaves
Ingredients:
- 1½ packages (1½ tablespoons or 11 grams) active dry yeast
- ½ cup (100 grams) granulated sugar, plus 1 tablespoon (12 grams)
- 1¾ cups (437.5 ml) warm water
- ½ cup (118 ml) vegetable oil
- 4 large eggs, room temperature
- 1 tablespoon (15 grams) salt
- 8½ cups (1,063 grams) all-purpose flour
- 2 tablespoons (14 grams) sesame seeds or poppy seeds, (optional)
- 1 large egg, whisked with a splash of water (for egg wash)
Preparation:
1. In a small bowl, lightly stir together the yeast, 1 tablespoon of sugar, and warm water. Place in a warm place, preferably, an oven that is turned off, for about 15 minutes, or until frothy and foamy. If your yeast has not foamed, then toss it and start over. It’s important for the yeast to activate properly.
2. In the bowl of an electric mixer, or a very large bowl if you’re doing this by hand, combine the yeast mixture, the remaining ½ cup sugar, oil, eggs, and salt together. Whisk until completely combined. While the mixer is running on low, slowly add the flour, one cup at a time. Mix until the dough comes together and all the flour is used up. Switch to the dough hook and knead on high for about 5 to 7 minutes until the dough is smooth, elastic and somewhat sticky. It should come off the sides clean. If you find that your dough is too sticky and is sticking to the sides and bottom of the mixing bowl, add a bit more flour. If you see that your dough is too dry and isn’t coming together, then add a splash of water.
3. After it kneads and is smooth, transfer the dough onto a lightly floured work surface. Knead by hand just to form it into a smooth ball. Grease a large bowl (the mixing bowl will do if it’s large enough) with vegetable oil. Drop in the dough ball and turn over to coat both sides. Cover loosely with plastic wrap and a damp cloth. Place in a warm place (turned off oven again) for about 1 hour, or until doubled in size. Punch the dough down and allow to rest for another half an hour.
4. Transfer the dough to a lightly floured work surface. Knead it into a smooth ball once more and then cut in half. Working with one half at a time (covering the other half with a cloth to prevent drying) cut it into 6 even pieces. Roll out each dough piece into a 12 inch rope. Pinch all six ropes together at the top, spreading out the ropes. Braid the dough together to form a tight braided challah bread. I’d try to describe how to braid it but I’m afraid I’d only confuse you. Check online for tutorials or videos! Repeat the entire process with the second dough half, to make two loaves.
5. Place the loaves onto two baking sheets that are lined with parchment paper. Brush each loaf with the egg wash very liberally. Sprinkle with sesame seeds, poppy seeds, coarse sea salt or all three, if you wish. You could also just leave them plain. Bake in a preheated 375°F oven for about 35 t0 40 minutes minutes, or until golden brown all around. Remove loaves from the oven and allow to cool on a wire rack before slicing and serving. Eat right away or store in an airtight container. Will keep for up to 7 days. Enjoy!
[/print_this]
Challah is my all time favorite bread! This recipe is truly perfect – I can totally imagine screaming from the rooftop about it. Yum!
Another challah recipeee! That really means I’ve got to try it really soon! And although I’m much too shy to obey your instruction to confess, I do agree wholeheartedly that bread is truly the best! Can’t wait to see the next post soon. The only thing I can think of is challah french toast. If I’m right, can I have some?
I was drooling over your instagram posts of this while patiently waiting for the recipe to be posted. Definitely going to make it this weekend, and the best part is it makes 2 loaves, one to keep and one to share….maybe. 😉
Its my first time on the site and I’m so happy I clicked it. You’re so funny Jonathan and it is so cool to see some else that crazy about bread like I am. I’m definitely making this challah. Thanks Jonathan.
Johnathan…you never cease to amaze me…humm bread…when i was born 69 years ago my grandmother was taking bread out of the oven to celebrate…we are Italian…..bread…yes…just like you…manna from heaven. Your photo tutorial , as always, is stunning. Love you have a window exactly where you are baking ! Your instructions for the braiding were perfect ( after 48 years of a hairdressing career, we could have used these photos! they were perfect. much love to you…
I am so guilty of carrying Trader Joe’s little challah rolls around in my purse to much on…challah is my all-time comfort food. And yours looks delicious! Thanks for sharing, I love the step by step photos!!
Thank you!! I’m glad you enjoy all the photos! Hope you give some of the recipes a try!
Love Challah and made it a few times now. Since I don’t have much time (nor patience) to make that lovely shape, I always roll it as if it was a cinnamon roll 😀
That’s a good tip! I’m going to do that next time so that I won’t have to go through all that trouble of braiding! Thanks for sharing!
Hi Jonathan!
Question, i normally don’t stock vegetable oil, can I use canola or olive oil?
Hello! Of course! Feel free to use either one of those! It’ll definitely work out!
That is one beautiful bread!
I made this last night and I’m avoiding the kitchen altogether because I eat a piece every time I pass through.
It’s so good!
Thank you for making it! And I know what you mean. But you have more will power than I do, I would’ve (okay okay I did) devoured both loaves all at once.
Seriously, you’re awesome! I am so making this challah, especially with Rosh Hashanah around the corner. Thank you for such great instructions.
Thank you very much! I hope you had a great Rosh Hashanah filled with tons of delicious challah!
Did you sing the Shabbat song while making the challah? 😉
I’m so happy that Shabbat is here………..
This is the first time I ever made Challah bread. I shared a loaf with my neighbor. She said It was better than from the bakery. It is delish!
You are a gem for sharing with your neighbor. I would’ve just eaten both loaves myself, but nope, not you. You shared! Hooray for sharing! So glad you both enjoyed it!
i’ve just discovered your blog and i’m already in love! it’s so comfortable here, simple layout, STUNNING pictures and goooooooooooood i love bread it looks so mouth-watering! must do it! also you’ve got some seriously beautiful hands 🙂
I’m glad you discovered the blog! Thank you very much! You must make this bread very soon! Oh and my hands thank you for the compliment. They’re awfully flattered.
I have a question, and before I ever ask, please forgive me for thinking of doing this to this beautiful bread. Can the dough be divided in half and baked like a traditional loaf, without the braiding?
For the past 35 years, I have been searching for a recipe for “egg bread” that I got out of a bag of bread flour back in the early 70s. I have failed in every search. This recipe seems to be very close to the one I lost, but, for every-day bread, I don’t think I would take the time for all the fancy braiding. Not to say that it isn’t beautiful, or that I wouldn’t do it for special occasions. I just wondered if–for daily baking–it could be shaped into a plain old loaf.
Thanks
This is a perfectly good question! You can definitely skip the braiding and just baked as a traditional loaf! It’ll still taste the same. I hope your search for the recipe stops here. I think you’ll really fall in love with this bread! It’s perfect for all your bread needs. Thank you for writing! Let me know how it turns out.
I have made this recipe at least 2-3 times at this point. I’ve eaten a lot of challah (with butter and honey, with grape jam I made from grapes I picked – that was an adventure, and with just the air that was circulating around the slice as I crammed it into my mouth). I guess the point – OMG THANK YOU!!! It is amazingly delicious and way easier than it looks – evidenced by the “YOU BRAIDED THIS?!?!” I got from friends that I gave a loaf to. They seriously didn’t believe I made it (and I’m no slouch in the kitchen).
Keep being awesome!
Yum! This recipe is rising on my stove as we speak! Hope it turns out!!!! Shabbot Shalom!
delicious pictures 😀
It’s so popular in Poland,but we using crublme not poppy seeds, however both verions are good 🙂
My dad was a professional baker and challah was his specialty. Of course I have his recipes…unfortunately they are the bakery recipes and I could make a dozen fabulous loaves, but not just one or two! I have been looking for a recipe similar to his that would result in that soft, feathery tear-away texture. The loaves I have been turning out are all good…BUT, I want that feathery texture! I think your recipe is going to do it. I will let you know! Thanks!
I hope this one is it, too!
Hi! Is it possible to half this recipe without altering the results? I want to make an apple stuffed challah for my small family this Rosh Hashanah and our baby can’t have honey otherwise I’d use your half batch recipe!
Hi Shalini! You definitely can! Here is the ingredient list cut in half! The directions will remain the same! Let me know if you have any questions!
1 package yeast
1/4 cup granulated sugar, plus 2 teaspoons
3/4 cup warm water, plus 2 tablespoons
1/4 cup vegetable oil
2 large eggs
2 teaspoons salt
4 1/4 cups all-purpose flour
1 tablespoon sesame seeds or poppy seeds
1 egg, whisked with water (For egg wash)
Thanks! I know sometimes simply halving can change texture so I wanted to be sure 🙂
My husband said to me yesterday ” babe you should make that eggy Jewish bread”. I hadn’t a clue what he was talking about! I asked well where did you have it maybe I can ask thier recipe, of course he couldn’t recall, just remembered it was awesome. So google to the rescue, well more like Johnathan to the rescue. I have never had this bread, it turned out fabulous. I gave our 2 year old some pieces to roll out and copy me, she had a blast! Occupied kid and fabulous bread, life is good!
Having another celebrate Israel day at our church so this recipe will definitely be used this time, thank you Jonathan
Thank you for giving it a try! I hope everyone enjoyed it!
I’m totally making this for the boyfriend when he visits next, would it be possible to freeze an unbaked loaf and bake it later? If so would I have to thaw it first? Thanks so much!